Aug 11, 2012

Pocket Knives, Don't leave home without it!


My love affair with knives goes back to when I was just a kid, before I even had a knife I would sit on the front porch and sharpen a popcicle stick to a point on the concrete. Why I did that I'm not       sure, maybe it was some primal inclination to or a move towards self relience. Nonetheless after I got  my first pocketknife at the age of seven or eight (which is the small faux pearl handled penknife)  I've had one in my pocket ever since. 

When I was in my early teens I started working on the neighbors farm stacking hay in the mow,feeding and helping to milk the cows.  A pocketknife was a necesity, a tool you carried and used everyday on the farm and at home.
I even carried a knife in school but back then almost everyone I knew carried some type of a knife to school and it never raised an eyebrow.In fact it wasn't uncommon to see shotguns hanging in the gun racks in the school parking lot during small game season and no one got stabbed or shot, but times have changed I guess.                                                 

When it comes to pocketknives the skies the limit and theres a style, size or specific use you can get one for. They can be works of art or mechanical wonders with a multitude of functions combined with a cutiing blade. For the most part they can be carried and used without raising unjustified alarm, well maybe unless your getting a patdown by the TSA.

Rant Warning:
There was a day and age I think when a man was expected to 'fend for himself' or at least try, you were expected to be responsible for yourself.  From one of the many books I've read I remember a quote "I wouldn't trust a man who doesn't carry a knife". Where I read that I can't remember but I think it holds true in that the unprepared expect they will benifit from those that are, that they really don't have to do their part...that someone will be there to bail them out and that they don't even have to try. 
 Like the Boy Scout Motto "Be prepared"
"Be prepared for what?" someone once asked Baden-Powell, the founder of Scouting,
"Why, for any old thing." said Baden-Powell.

Stay safe
Bob


Jul 30, 2012

History Around Us: A trip Not Wasted

     Its been awhile since I've posted anything but life seems to get in the way. Nonetheless we went on a drive and I was hoping to get photos of some sites in Burnt Cabins for a post on Pre French and Indian period locations and it fell through due to my lack of planning on the area.

    On the trip back we came back through Letterkenny Army Base and found the Chapel that was built by Italian POW's during WW II and the 9/11 memorial and I got some pic's.

The 9/11 memorial, I think they did a very nice job, it was kind of awe inspiring to see an actual piece from the towers.


        The Italian POW battalion worked at the General Supply and Transpotation Division at the depot. The commander on one of his nightly inspections discovered an elderly Italian(a stone mason) trying to kill himself. Upon further investigation he found that the man had gotton word his wife had died in Italy and he felt he had nothing to live for.
         It occured to him they might be able to help the prisoner if they could help him find a reason to live. The commander called him into the office the next morning and asked the elderly man if he would be interested in designing a Chapel for the base. The man became interested and said he could not only design the Chapel but he could build it.

         The chapel tower was built first using native stone gotton from the bases of old farmhouses located on the base and the rest quickly followed. It was dedicated in May of 1945 and closed soon after the war ended. It was reopened in 1963 and refurbished.


Stay safe, Bob

Nov 6, 2011

Never give up!!

         Awhile back at the plant I work at we had a part wear out on a machine, the line was down and quite frankly we weren't sure just how to repair it to get the line running. The first attempt at fabricating a piece failed miserably , I thought about it awhile and started again, the machinist commented on how the first attempt didn't work and what made me think the second attempt would. My stress level was pretty high and I just stopped, "You never give up, never.....not even in the face of death". Now my comment got me some strange looks, but I proceeded to work and the second attempt was successful and looked promising.
When the part was done I gave a little story, a true one in fact.

        I was walking down around the corner of the barn next to the manure pit one morning  and I heard a noise that sounded like faint grunting and water splashing. I listened close for awhile and finally figured out that it was coming from a one foot diameter pipe that goes down in the ground about four feet to a valve for a manure transfer pipe. Now this pipe was about half full of water and looking in it there was a ground hog trying to stay afloat, and the way he looked he was about done for.
       Now his predicament was dire but he kept trying to crawl up the pipe which was futile, but not to him. His primal little brain knew one thing and that was he wanted to get out of there.....to live, he wasn't about to give up. Now a ground hog is a real nuisance especially to a farmer, but I couldn't in good conscience let him just drown so I went to the shop and  got a piece of pipe and made a hook. By the time I got back he was on his last leg, spending more time under the water than than on top. He came up again and I got the hook under him and got him out. He was whipped and walked slowly over to his hole and disappeared under the ground to live another day.
I covered the hole so it wouldn't happen again but for some reason I just found it somewhat inspiring that on his own he was done for but he kept trying.


 One of my favorite quotes is by Winston Churchill  on October 29, 1941,  when he visited Harrow School.
 
" Never give in. Never, never, never, never--in nothing, great or small, large or petty--never give in, except to convictions of honor and good sense. Never yield to force. Never yield to the apparently overwhelming might of the enemy".


Stay safe
Bob


Aug 21, 2011

A Simple Wooden Spoon

It's been awhile since I've posted anything here, and I hope in the near future I'll be posting some worthwhile stuff but life is getting in the way.
I did make it to a little strip of woods and harvested some Bass Wood today for some carving and hearth boards.  This is the first spoon I've carved in quite some time, in fact It's the first one I've carved green. I decided to try and leave the bark on.


I did give it a coat of flax seed oil hoping it doesn't dry out to quick and crack, and once it dries some I'll sand it more and coat it again.

Stay safe
Bob

Jul 10, 2011

Making a Paracord Bracelet , Part One The Lanyard Knot


Over at Bushcraft USA they have a Bushclass, one of the class electives was to make a cobra weave paracord bracelet. Now I'm not a knot tying genius and after getting through the first one it is quite easy and a lot of fun, giving you a convenient way to carry at least 8 feet or more of usable paracord on your wrist depending on the style. There are many different variations on how a bracelet is made with different weaves and buckles and knots, but this is the method I'm currently using as it is functional and simple.

As a picture is worth a thousand words I tried to set up the knots so that they can be done by following the different colored cordage in the order that I make them in with measurements of the cut pieces to minimize waste.

The Two cut lengths are
28" inches for the wrist lanyard
8' feet 2 1/2" for the cobra weave

Starting with the 28" piece you tie a lanyard knot in the end, I like this knot as it makes a nice looking round ball to use as the "button".


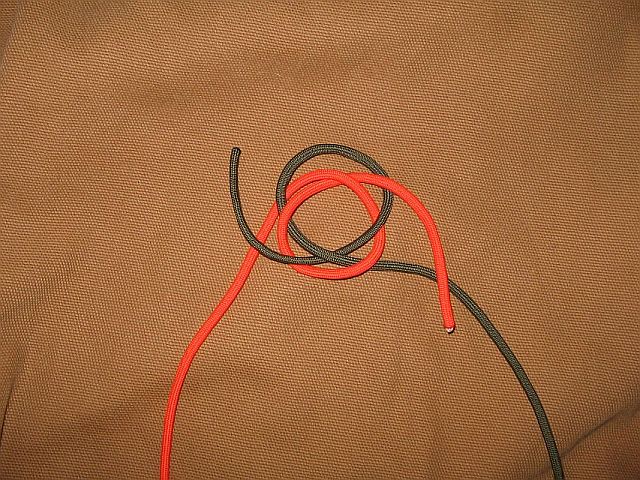
The free end of the paracord passes underneath the standing part forming an underhand loop.


The other end passes under the orange  loop you've made, around the free end  and goes over under over.


To make this easier I rotate the work slightly to get the free ends to pass over their opposite standing ends.


And up through the center.


This is the underside of the knot showing how the free ends come up through the center.


This is the finished knot, don't pull it up tight yet as it can be reworked to adjust to your wrist size.


Once you get the knot done you can adjust it to your wrist size by adjusting the strands of the knot, keep in mind that you want it a little large as some of the diameter is reduced by the cobra weave. I also make final adjustments after I'm finished with the cobra weave before pulling it tight


Part two, The Cobra Weave


Stay Safe
Bob

Making a Paracord Bracelet , Part Two The Cobra Weave

 In Part One The lanyard Knot we started off with making the piece around the wrist.

Now that you have the wrist loop made and approximately sized you start your cobra weave with your 8 foot piece of cord.


I find it easier if you place a caribiner in the end of the loop, it give you a way to hold it and push the knots up against as you work.


Fold your 8 foot piece in half and you lanyard goes in between the two at the loop.


Take the top (green) over the orange.


And underneath your lanyard.


And up through the loop from behind.


It should look like this, pull this tight and push it against the caribiner.


The pencil points to the loop formed by your knot, this is the side you place on top of the lanyard.


The other end goes over top.


Underneath and up through the loop.


And the process alternates and repeats itself


As I work I try to keep the weave pushed up tight to the previous knots


Once I Have the cobra weave about half an inch away from the lanyard knot I try it on to check the fit, make any adjustments and tighten the lanyard knot.


I pull the last cobra weave knot tight and cut off  the free ends leaving about 1/4" then melt it with a flame, I also trim and melt the free ends of the lanyard knot at this time. I usually wait a second or so before pushing the molten nylon  against the bracelet.


I hope my tutorial is clear and with a little over 10 feet of paracord you can make your own, there are also many variations of weaves and tutorials on this subject on the internet and it is quite an addictive hobby once you get started.


Stay Safe
Bob